Interactive Map (test & coordinates)
Use the tools below to quickly jump, copy, or test coordinates on the world map.
Legend


How to use silksong map
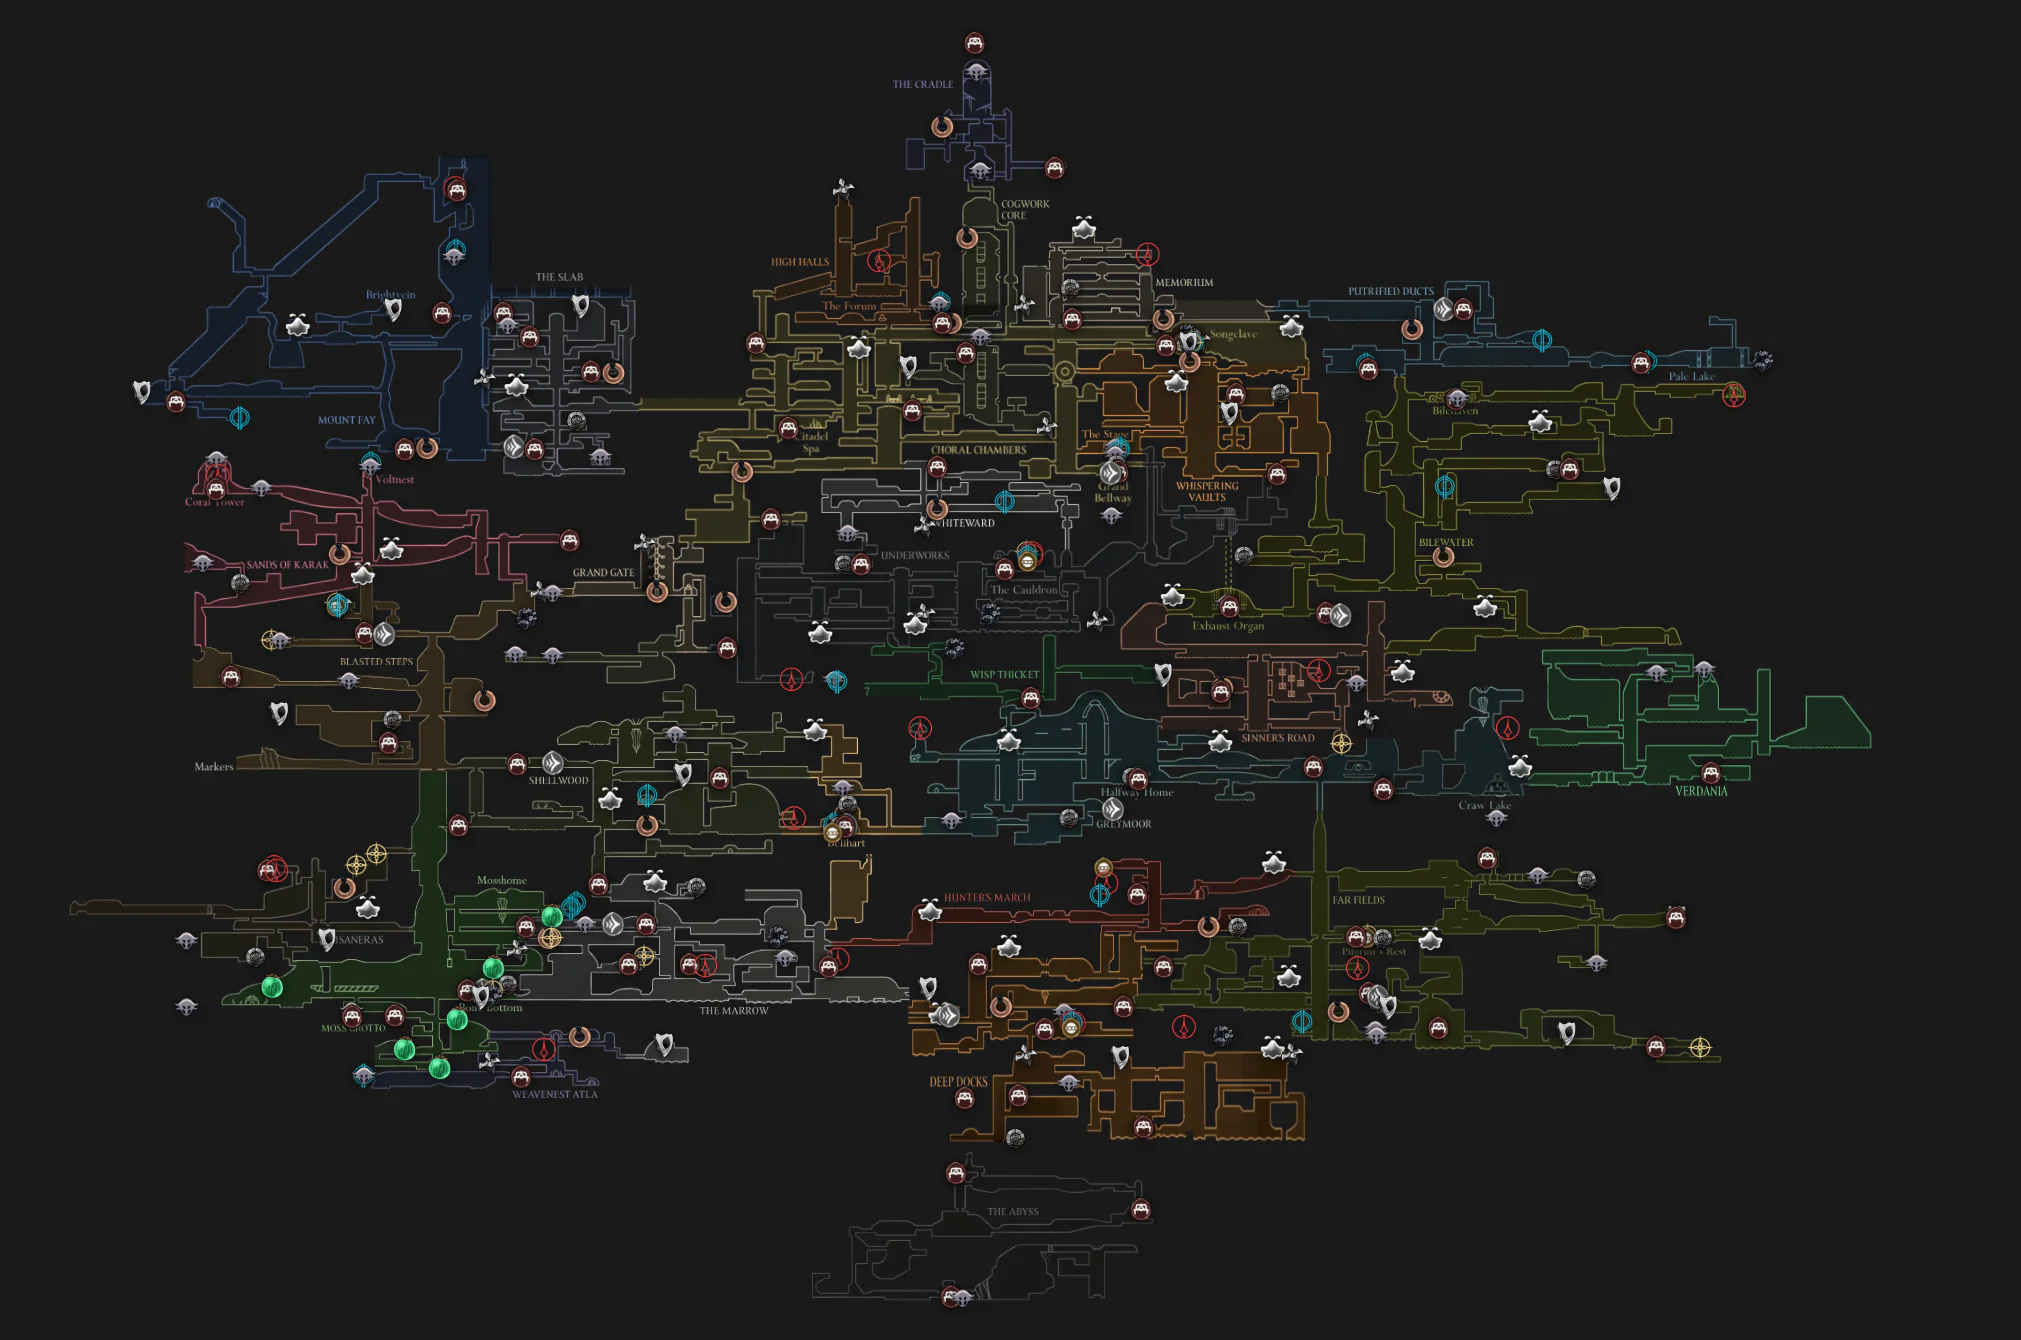
World overview: The map covers the kingdom of Pharloom, a large interconnected world designed for fast traversal and vertical movement. This guide summarizes major areas, fast travel (Bellways), benches, vendors, and common map markers to help you navigate Silksong efficiently.
Use the tools below to find, record and share locations quickly. Basic steps:
- Click on the map to read coordinates (x, y).
- Use "Copy coords" to copy them to clipboard or "Open on Wiki" to view on the community map.
- Save frequently used locations with the "Save locally" button for later recall.
📚 Silksong Map & World Documentation
Comprehensive reference guide for Silksong's world map, travel systems, cartography tools, and area progression.
🌍 World Scale
Pharloom's size, content comparison, and progression structure
🗺️ Map Locations
28 areas, acquisition methods, and cartographer Shakra guide
🔔 Bellways Travel
Fast travel system with 12 stations and unlock costs
🔥 Deep Docks
Key area guide with Swift Step ability and Lace boss
🌍 I. The Scale of Pharloom
1. World Overview
The game takes place in the kingdom of Pharloom, a sprawling, dense maze that emphasizes vertical ascension. The map design matches Hornet's fast movement speed with intricate, interconnected level layouts.
Size & Content Comparison
- Map Size: Pharloom is estimated to be nearly 2.5 times the size of Hallownest from the original Hollow Knight
- Enemies: Over 200 enemy types (compared to 140+ in Hollow Knight)
- Bosses: Over 40 boss encounters (compared to 30+ in Hollow Knight)
- Benches: Approximately 100 rest/save points (compared to ~51 in Hollow Knight)
- Completion Time: Steam achievement target for 100% is under 30 hours (vs. 20 hours in Hollow Knight)
2. Game Progression Structure
Silksong's narrative unfolds across three major acts:
- Act 1: Initial exploration of lower Pharloom regions (Moss Grotto → The Marrow → Deep Docks → Far Fields → Greymoor → Bellhart → Shellwood → Blasted Steps)
- Act 2: Entry to the Citadel of Song, the game's central hub with multiple interconnected subareas
- Act 3: Major world changes - enemies and paths altered across approximately 90% of the map, introducing new challenges and quest lines
🗺️ II. Acquiring Maps & Complete Locations Guide
Finding the Cartographer Shakra
Shakra is a traveling cartographer and merchant who sells maps, mapping tools, and custom markers throughout Pharloom.
| Aspect | Details |
|---|---|
| Initial Location | First encountered in The Marrow |
| Tracking Method | Listen for her singing voice and follow the trail of rings in the environment |
| Fallback Location | If missed, returns to Bone Bottom. Summon by attacking the bell on the raised platform |
| Map Inventory | Sells 13 maps total across 12 different locations (both Mosslands and The Marrow maps sold in The Marrow) |
Essential Mapping Tools
Purchase these tools from Shakra to maximize map utility:
| Tool | Cost | Function | Priority |
|---|---|---|---|
| Quill | 50 Rosaries | Allows Hornet to add discovered details to maps when resting at a Bench. Without it, you only see region outlines. | ⭐ Highly Recommended Early Purchase |
| Compass | 70 Rosaries | Shows Hornet's current location on the map | Recommended |
| Bellway Pins | 60 Rosaries | Marks fast travel stations on the map | Useful for navigation |
| Vendor Pins | 80 Rosaries | Marks merchant locations on the map | Useful for shopping |
| Shell Marker | Varies | Custom marker for flagging areas to revisit | Optional |
| Dark Marker | Varies | Custom marker for flagging areas to revisit | Optional |
Complete Map Locations (28 Areas)
Silksong features 28 unique areas with maps acquired from Shakra, specialized machines, or found in the world.
| Map Name | Acquisition Method | Price | Location/Source | Prerequisite |
|---|---|---|---|---|
| Mosslands Map | Sold by Shakra | 40 Rosaries | The Marrow | N/A |
| The Marrow Map | Sold by Shakra | 50 Rosaries | The Marrow | N/A |
| Deep Docks Map | Sold by Shakra | 50 Rosaries | Deep Docks | N/A |
| Far Fields Map | Sold by Shakra | 50 Rosaries | Far Fields | N/A |
| Greymoor Map | Sold by Shakra | 70 Rosaries | Greymoor | N/A |
| Bellhart Map | Sold by Shakra | 40 Rosaries | Shellwood | N/A |
| Shellwood Map | Sold by Shakra | 40 Rosaries | Shellwood | N/A |
| Wormways Map | Sold by Shakra | 70 Rosaries | Bone Bottom | N/A |
| Hunter's March Map | Sold by Shakra | 70 Rosaries | Hunter's March | N/A |
| Blasted Steps Map | Sold by Shakra | 70 Rosaries | Blasted Steps | N/A |
| Sinner's Road Map | Sold by Shakra | 90 Rosaries | Sinner's Road | N/A |
| Mount Fay Map | Sold by Shakra | 40 Rosaries | Mount Fay | N/A |
| Bilewater Map | Sold by Shakra | 90 Rosaries | Bilewater | N/A |
| Sands of Karak Map | Sold by Shakra | 90 Rosaries | Sands of Karak | N/A |
| Grand Gate Map | Purchased from Machine | 40 Rosaries | Grand Gate | N/A |
| Weavenest Atla Map | Found in Machine | Free | Weavenest Atla | Defeat Widow |
| Underworks Map | Found in a room | Free | Underworks | N/A |
| Choral Chambers Map | Purchased from Machine | 70 Rosaries | Choral Chambers | N/A |
| Cogwork Core Map | Taken from a device | Free | Cogwork Core | N/A |
| Whispering Vaults Map | Purchased from Machine | 70 Rosaries | Whispering Vaults | N/A |
| Whiteward Map | Purchased from Machine | 70 Rosaries | Whiteward | Requires White Key |
| The Slab Map | Found on a Husk | Free | The Slab | Requires Key of Apostate (found in Bilewater) |
| The Cradle Map | Purchased from Machine | 70 Rosaries | The Cradle | N/A |
| Memorium Map | Purchased from Machine | 70 Rosaries | Memorium | N/A |
| High Halls Map | Purchased from Machine | 70 Rosaries | High Halls | N/A |
| Putrified Ducts Map | Found in area | Free | Putrified Ducts | N/A |
| Verdania Map | Found on a body | Free | Verdania | Act 3 progression/Green Prince quest |
| The Abyss Map | Found in Rune Machine | Free | The Abyss | Act 3 progression/Divine Bell Key |
💡 Tip: Orange-highlighted maps are obtained from machines or found in the world, not sold by Shakra.
🔔 III. Fast Travel System: Pharloom Bellways
The primary fast travel method in Silksong is the Pharloom Bellways, similar to the Stagways in Hollow Knight. Fast travel stations are marked by a signpost displaying three chevrons pointing to the right (>>>).
Unlocking the Bellways System
- Acquire Silkspear: First obtain the Silkspear ability in the Mosshome sub-zone of Moss Grotto
- Defeat the Bell Beast: Return to the top of The Marrow and use the Silkspear to break the silken bindings of the Bell Beast, then defeat it in a boss fight
- Activate Transport: Once defeated, the Bell Beast becomes the mode of transport. Stand on a platform next to it to instantly travel to any discovered Bellway station
- Activation Cost: Each new Bellway station must be discovered and activated, costing a varying amount of Rosaries
Complete Bellway Locations & Unlock Costs
| Area | Unlock Cost | Location Details |
|---|---|---|
| Moss Grotto | Free | Located in the Bone Bottom pilgrim outpost |
| The Marrow | Free | The location where the Bell Beast boss is fought |
| Deep Docks | 50 Rosaries | Found in the bottom left-hand corner of the area |
| Far Fields | 50 Rosaries | Located along the top platforms of the main stretch |
| Greymoor | 80 Rosaries | Found underneath the Halfway Home |
| Bellhart | 80 Rosaries | Located at the main merchant rest point, between Shellwood and Greymoor entrances |
| Shellwood | 60 Rosaries | Found in the west of the area, near the Blasted Steps entrance |
| Blasted Steps | 80 Rosaries | Located at the very top of this vertical area |
| Choral Chambers | 120 Rosaries | Located in the southeast of the area, known as the Grand Bellway |
| The Slab | 50 Rosaries | Located in the southwest of the area, crucial for exiting the region |
| Putrified Ducts | 120 Rosaries | Located in the northeast, accessed from the top right of the main vertical section |
| Bilewater | 120 Rosaries | Located in the southwest of the region |
💡 Alternate Fast Travel: Within the Citadel of Song (the main location of Act 2), players can discover Ventrica Stations as an additional fast travel system.
🔥 IV. Key Area: Deep Docks
The Deep Docks is a fiery, hazardous region that follows The Marrow, characterized by dangerous molten lava and intense platforming challenges.
| Aspect | Details |
|---|---|
| Key Ability | Swift Step — Ancestral Art dash ability discovered here, crucial for crossing scorching rocks and navigating the region |
| Act 1/2 Boss | Lace — A fencing master who wields a saber and uses disciplined fencing attacks. Must be defeated to gain access to Far Fields |
| NPCs |
• Shakra (Cartographer) • Forge Daughter (Blacksmith) • Ballow (Quest giver) |
| Act 3 Quest | "The Dark Below" — Find Ballow near Forge Daughter to receive the Diving Bell Key. Use this key on the Diving Bell in the eastern deep pathway to descend into The Abyss |
| Bellway Cost | 50 Rosaries (located in bottom left corner) |
🗺️ V. Areas & Progression Overview
Act 1 Example Progression Route
A typical route that many players follow in early progression:
- Moss Grotto — Starting area; linear progression where Hornet learns basic combat and movement
- The Marrow — Connects Moss Grotto to Deep Docks; features early boss encounters and Shakra's first appearance
- Deep Docks — Lower area with lava hazards; acquire Swift Step ability and defeat Lace
- Far Fields — Open platforms with rising air currents for vertical traversal
- Greymoor — Large region with significant landmarks and multiple boss encounters
- Bellhart — Bell-themed area serving as a crossroads between Shellwood and Greymoor
- Shellwood — Features unique traversal mechanics and a challenging boss fight
- Blasted Steps — Highly vertical area culminating in the Last Judge boss and the Grand Gate entrance to the Citadel
The Citadel of Song (Act 2 Main Hub)
The Citadel contains multiple interconnected sub-areas and serves as the central hub for Act 2:
- Grand Gate — Main entrance to the Citadel
- Choral Chambers — Contains the Grand Bellway and the Songclave settlement
- Whispering Vaults — Large library area filled with knowledge and secrets
- Whiteward — Small connector area (requires White Key to access)
- High Halls — Important for late-game melodies and progression
- Cogwork Core — Challenging platforming area with mechanical hazards
- Memorium — Themed area with unique challenges and its own map
- The Cradle — Story-significant location within the Citadel
VII. Quick Reference Summary
🗺️ Maps
- 28 total areas
- 13 from Shakra
- 15 from machines/world
- Quill: 50 Rosaries ⭐
- Compass: 70 Rosaries
🔔 Bellways
- 12 total stations
- 2 free (Moss Grotto, Marrow)
- 10 paid (50-120 Rosaries)
- Unlock: Defeat Bell Beast
- Alt: Ventrica (Citadel)
📊 World Scale
- 2.5× Hallownest size
- 200+ enemies
- 40+ bosses
- ~100 benches
- 30h for 100%
📝 Note: All figures and area lists are community-compiled from gameplay observations and may be subject to minor variations. Always verify original sources before citing in formal content or publications.
Frequently Asked Questions (FAQ)
Common questions about Silksong's map system, cartography tools, fast travel, and this interactive guide.
- Listening for her singing voice
- Following the trail of rings she leaves in the environment
- If you miss her, return to Bone Bottom and attack the bell on the raised platform to summon her
- Prerequisite: You need the Key of Apostate (found in Bilewater) to access The Slab
- Cost: Free (once you find it)
- Location: On a corpse/husk within The Slab region
- Bellway: The Slab has a Bellway station (50 Rosaries) in the southwest, crucial for exiting the area
- Price: 90 Rosaries
- Vendor: Shakra (cartographer)
- Location: Find Shakra in Bilewater by listening for her singing
- Note: Bilewater also contains the Key of Apostate needed to access The Slab
- Bellway: 120 Rosaries to unlock (southwest of region)
- Price: 70 Rosaries
- Vendor: Shakra (cartographer)
- Location: Find Shakra in Greymoor (track by singing voice and ring trail)
- Note: Greymoor is a large region with significant landmarks and multiple boss encounters
- Bellway: 80 Rosaries to unlock (underneath the Halfway Home)
- Price: 40 Rosaries (one of the cheapest maps)
- Vendor: Shakra (cartographer)
- Location: Find Shakra in The Marrow (first encounter area)
- Note: Shakra sells both the Mosslands Map AND The Marrow Map (50 Rosaries) in The Marrow
- Tip: Buy the Quill (50 Rosaries) first to fill in map details at Benches
- 1. Acquire the Silkspear ability in Mosshome (Moss Grotto sub-zone)
- 2. Return to the top of The Marrow
- 3. Use Silkspear to break the Bell Beast's silken bindings
- 4. Defeat the Bell Beast in the boss fight
- 5. The Bell Beast becomes your transport — activate stations by paying Rosaries (50-120 per station)
- 13 maps sold by Shakra (40-90 Rosaries each)
- 15 maps obtained from machines, devices, or found in the world
- 200+ enemies (vs 140+ in Hollow Knight)
- 40+ bosses (vs 30+ in Hollow Knight)
- ~100 benches (vs ~51 in Hollow Knight)
- Under 30 hours for 100% completion (vs 20 hours in Hollow Knight)
- Zoom: Use mouse wheel or +/- buttons
- Pan: Click and drag the map
- Coordinates: Click anywhere to see x,y coordinates and copy them
- Full width: Click "Full width" button to maximize the map
- Legend: Click "Toggle legend" to show/hide the legend below the map
- 1. Hard refresh the page (
Ctrl+F5on Windows,Cmd+Shift+Ron Mac) - 2. Check that
img/silksong-map.pngexists in the project folder - 3. Open browser console (F12) and check for any error messages
- 4. Ensure your browser has JavaScript enabled
- 5. Try a different browser if the issue persists
- Navigation: Use the hamburger menu (☰) in the top right
- Map: Use pinch-to-zoom gestures
- Full width: Tap the "Full width" button for a larger view
- Best experience: Rotate to landscape orientation
- Tables: Scroll horizontally to see all columns
x=####, y=####. A "Copy" button appears in the popup — click it to copy coordinates to your clipboard and share them with friends.